Readout
At a Glance
Bench fit
Best For
Bench fit notes
Working distance and field of view
- Working distance
- 120 mm
- Field of view
- Board-level inspection view
These two specs matter more than headline magnification for soldering, inspection, and manipulation work.
Lighting and stand behavior
- Illumination
- LED ring adjustable
- Stand stability
- Usable stock stand; heavier arm helps rework
Glare control and wobble usually decide whether a scope feels precise after the first week.
Overview
The short version
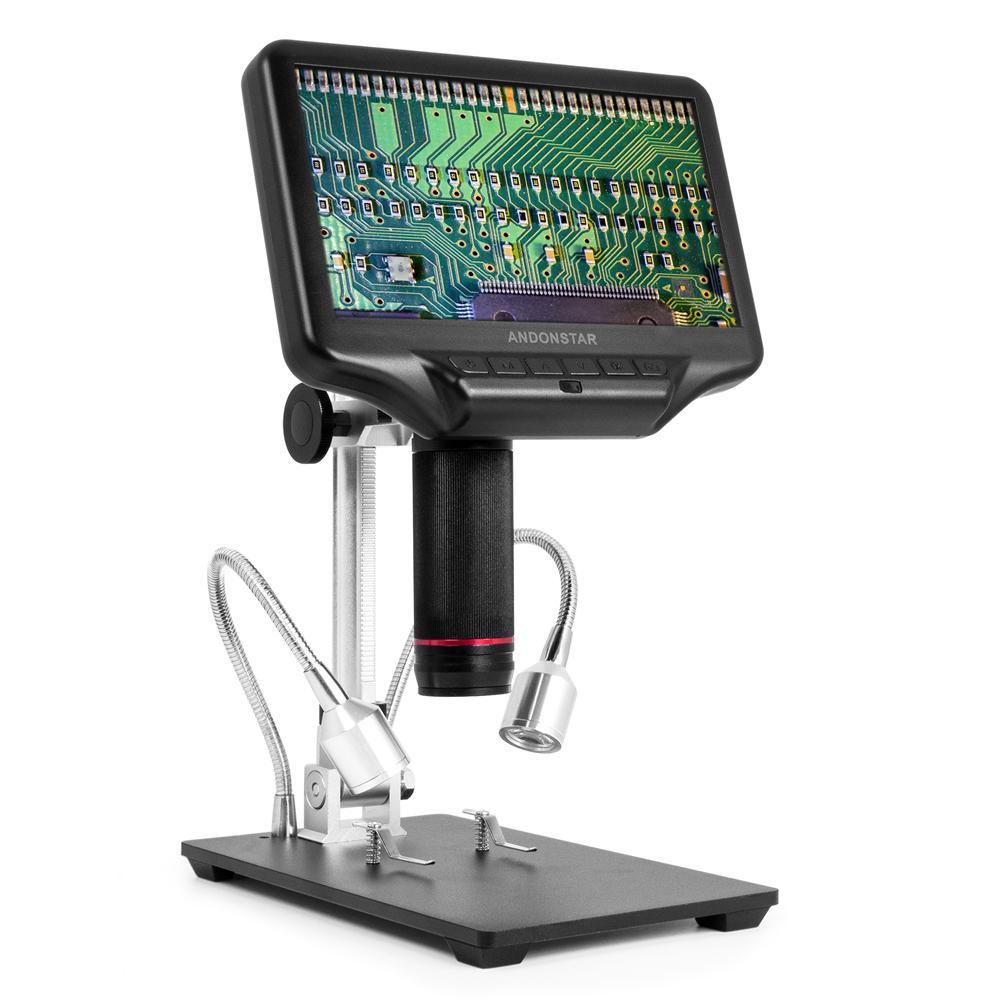
The Andonstar AD407 has quietly become the default USB microscope for serious solder rework benches under $150, and it earned that position by solving three specific problems that kill workflow on every other scope in its price tier: the laptop tether, the working distance, and the lag.
A USB microscope that needs a laptop to show the live feed is a microscope you fight with. Every time you reposition the board, you look up at the screen, then back down at the iron, then up at the screen. The Andonstar's 7-inch built-in IPS display sits at eye level on a 12-inch goose arm, so the iron, the pads, and the live feed are all in the same field of view. You stop context-switching. Your rework gets faster and your eye fatigue drops by an obvious margin within the first hour at the bench.
The 120mm working distance under the lens is the second part of the workflow story. That's the room a fine-tipped soldering iron needs to come in at an angle without bumping the optics, the room tweezers need to lift an 0402 resistor without occluding the camera, and the room a stencil and squeegee need to apply paste to a fine-pitch QFN without you having to swing the scope out of the way. 120mm is the working distance that turns a USB microscope into a usable rework tool. Most $80–$120 scopes give you 30–60mm and you spend the entire session fighting clearance.
Balance sheet
Pros and Cons
Pros
05- 7.5-inch IPS screen — no laptop required for live viewing or capture
- Flexible gooseneck arm provides excellent positioning for PCB inspection
- 7MP camera is well-suited to SMD inspection at practical bench magnifications
- Continuous magnification dial (10x–220x) — no discrete step jumps
- Captures still images and video directly to SD card
Cons
04- 7-inch screen is small for detailed specimen study — a monitor out gives better results
- Zoom range tops out at 220x — not suitable for high-magnification biology
- USB output mirrors the screen but doesn't provide a separate clean feed
- Software (Windows app) is basic and rarely updated
Why the AD407 Became the SMD Rework Standard Under $150
Three years ago the default recommendation in any electronics repair forum was 'get a real stereo microscope.' The AmScope SM-4TZ at $349 was the entry point and below that you had bad options — handheld scopes that wobble, USB scopes that lag, single-lens cameras that can't resolve SMD pad detail. The Andonstar AD407 changed the conversation by hitting price/performance points that didn't exist before.
The 7MP CMOS sensor resolves 0402 SMD pads cleanly at the scope's working magnification (roughly 50x–120x effective, depending on your viewing distance from the screen). That's enough resolution to read part markings on TSSOP and QFN packages, see the difference between a good and a cold solder joint on 0.5mm pitch, and inspect via fill on small holes. Three years ago you needed a $400+ camera to get that resolution.
The continuous-zoom rocker (10x–220x specified, but the genuinely sharp working range is roughly 30x–180x) is a real magnification adjustment, not the discrete-step zoom most cheap USB scopes use. You can dial in the exact magnification that puts the work area in the field of view without losing focus, which means less time refocusing every time you move from inspecting one component to another. This is the workflow benefit that's hardest to describe but the most obvious in daily use.
Andonstar AD407 vs Andonstar AD409 vs ADSM302: Which Should You Buy
Andonstar's own lineup confuses buyers because they release new models constantly and the differences aren't well documented. Here's the honest comparison among the three most-cross-shopped Andonstar scopes for electronics work.
The AD407 is the workhorse: 7-inch screen, 7MP sensor, 220x zoom, ~$139. Good build, proven track record, the model with the most YouTube tutorials and forum threads about it. If you want the scope that 'just works' for SMD rework and don't need anything special, this is the answer.
The AD409 Pro (~$199) adds a larger 10.1-inch screen, a polarizing filter (genuinely useful for reducing glare on shiny solder joints), and an upgraded UI with measurement tools. The bigger screen is the main reason to choose it over the AD407. The polarizer is the secondary reason. Image resolution is comparable. If your bench has room for the larger screen and you do a lot of inspection work on reflective surfaces, the upgrade is worth $60.
The ADSM302 (~$229) is the same 7-inch form factor as the AD407 but adds HDMI out (so you can project to a larger monitor for class instruction or YouTube production), better remote control, and slightly improved sensor noise performance. If you're producing repair content or teaching, the HDMI out alone justifies the price jump. For solo rework, the AD407 is still the right call.
Avoid the AD206S unless you're on a strict $60 budget — the smaller screen, lower-resolution sensor, and shorter working distance make it a fundamentally different tool. The price gap to the AD407 is worth closing.
Andonstar AD407 vs AmScope SM-4TZ Stereo Scope (the Real Comparison)
The conversation that actually matters when you're buying a microscope for SMD rework: digital scope with built-in screen, or stereo optical microscope with USB camera attached? The AD407 and the AmScope SM-4TZ ($349) are the two scopes most rework benches end up choosing between.
The AmScope SM-4TZ gives you true binocular stereo vision. Your two eyes see slightly different angles of the work area, and your brain reconstructs depth. This is genuinely transformative for fine soldering — you can see the iron tip approaching the pad in 3D, judge contact pressure visually, and place components with depth perception that no flat screen can match. For very fine work (0.4mm pitch QFN reflow, BGA rework, watch-movement fine adjustment), stereo optics are not just better — they're qualitatively different.
The AD407 gives you a 2D high-resolution image on a screen. You lose the depth perception. You gain better resolution at low magnification (the AD407's 7MP sensor at modest zoom outresolves what most users perceive through stereo optics), the ability to record video of the work, the ability to project the image to a second monitor, and a workflow where you're looking at a screen instead of through eyepieces (less neck strain, easier to share the view with someone else).
The practical answer: AD407 if your work is 0603 and larger, or if you're doing inspection and documentation as much as soldering. SM-4TZ if you're doing serious fine-pitch (0402 and smaller) component-level repair on a regular basis. Many serious rework benches end up owning both — the stereo for the actual soldering, the digital for inspection, photos, and video documentation.
Real-World Solder Workflow with the AD407
Bench setup matters more than most reviews mention. The AD407 ships with a basic stand that works but isn't ideal for sustained rework. The first upgrade most users make is replacing the stock stand with a heavier articulating arm (the same boom-style arms used for stereo microscopes work fine — the AD407 head has a standard mounting interface). A heavier arm eliminates the slight bounce when you contact the board and lets you position the scope at angles the stock gooseneck can't reach.
Lighting is the second variable. The AD407's built-in LED ring is adequate for most work but produces specular reflections on solder joints that can hide cold-joint defects. Adding an external lighting source at a low angle (a USB-powered LED bar, a desk-mount LED panel set to oblique illumination, or the OMAX 144-LED dual ring reviewed elsewhere in this lineup) eliminates the glare and reveals defects that the ring light obscures. This is a $30–$50 upgrade that materially improves the scope's usefulness.
Focus drift is the third real-world issue. The AD407's focus mechanism is manual and the focus knob has slight backlash. For sustained sessions you'll re-focus periodically as the workpiece height changes (especially when reflowing components — the heat causes minor expansion that drifts the focus). Plan for it. Don't fight the scope; just touch the focus knob between operations.
Video recording: the AD407 records to SD card at 1080p. The bitrate is modest (it's not Sony A7S footage), but it's adequate for documenting rework procedures, sharing repair questions in forums, or producing basic YouTube content. The microphone on the unit is bad enough to be unusable; use an external mic if you're producing audio.
Field of View, Stand Stability, and Calibration
The AD407's practical field of view is strongest in the middle of its zoom range, where you can see enough of a board to orient yourself while still resolving component markings and solder fillets. Pushing zoom too far narrows the field and makes every board move feel exaggerated. For repair workflow, set the magnification so the full component plus surrounding pads stay visible, then adjust working distance before chasing more zoom.
The stock gooseneck stand is usable for inspection, but repeated soldering benefits from a heavier arm or more rigid mount. Tiny stand bounce can look like hand jitter on the screen, which makes fine tweezer placement feel less precise than the optics actually are.
For measurement overlays, do not quote exact dimensions unless the software has been calibrated at the same zoom and working distance being used. Calibration changes when the head height changes. Use the measurement tools for relative checks and documentation unless you have a verified calibration slide.
The Honest Limits of the AD407
The 220x maximum magnification is a soft ceiling. Past about 180x the optical resolution drops noticeably and you're really just looking at sensor crop, not additional resolved detail. If you're doing BGA rework, ball-pitch inspection on 0.4mm pitch parts, or very fine die-attach inspection, you'll want a scope with better optics at high magnification — the AD509 Pro ($299) or a stereo scope with a 2x supplementary lens are the upgrade paths.
The Windows capture software is the most-complained-about aspect of the scope and the complaints are valid. The bundled app is functional but ugly, rarely updated, and missing features (no live measurement, no automated calibration, no overlay tools). The workaround is the same as every other Andonstar scope — the AD407 presents as a UVC device on Windows and macOS, so OBS Studio, Camo, and any other webcam-aware app gives you a better capture experience than the bundled software. Andonstar's own app is best used only for the SD-card-to-PC file transfer, not for live capture.
The build quality is consumer-grade. The plastic body is durable enough for normal bench use but the gooseneck arm will eventually develop sag after a year or two of repositioning. Treat it as a 3-to-5-year tool, not a 15-year tool. At $139 that's the right amortization.
None of these limits change the basic recommendation: under $150, this is the scope to buy for SMD rework, PCB inspection, and electronics-repair workflow. Above $150 the calculus changes and stereo optics become the better answer.
Verdict
Our Verdict
The Andonstar AD407 is the strongest USB microscope fit here for electronics repair under $150. The built-in screen removes laptop friction on PCB benches, and the 120mm working distance gives enough room for an iron and tweezers. If you're doing inspection-heavy board work, this is the first model to compare.
Full readout
| Full Specifications | |
|---|---|
| Working Distance | 120mm |
| Illumination | LED ring adjustable |
| Stand / Mount | Articulating gooseneck stand |
| Stand Stability | Usable stock stand; heavier arm helps rework |
| Magnification | 10x–220x |
| Field of View | Board-level inspection view |
| Camera Resolution | 7MP |
| Frame Rate | 30fps |
| Screen Size | 7.5in |
| Connection | USB + HDMI |
| Built-in Screen | Yes |
| Camera Included | Yes |
| Calibration Support | On-screen measurement after calibration |
| Mount Thread | — |
| LED Count | — |
| Brightness Control | — |
| Color Temperature | — |
| Power | — |
| Stand Included | Yes |
| Weight | 0.85kg |
Buying call
Andonstar AD407 Digital Microscope
Best if you need 120 mm working distance with LED ring adjustable for electronics repair.
Prices may change · Check current Amazon listing before buying
FAQ
Frequently Asked Questions
Can the Andonstar AD407 see 0402 SMD components clearly?
Andonstar AD407 vs Tomlov DM9: which one for soldering?
Does the AD407 work without a computer, just standalone?
Is the Andonstar AD407 worth it for watchmaking and watch repair?
Go deeper
Related Buying Guides
Bench comparison
Compare With Similar Microscopes
Celestron
5 MP Handheld Digital Microscope Pro
25 mm · Built-in LED · Handheld
$89
Versus